LAMPSTACK Image Guide
Introduction
By default, network access is turned off to a ECS instance. You can specify rules in a security group that allows access from an IP address range, port, or ECS security group.
You must specify port numbers (for TCP):
- 22 (ssh)
- 80 (http)
- 443 (https)
- 21, 20000~30000 (ftp)
Security groups document URL: Alibabacloud Security group
Image environment description
Image version description
Software version
- Apache2.4
- PHP8.3, 8.2, 8.1, 8.0, 7.4, 7.3, 7.2, 7.1, 7.0, 5.6, 5.5, 5.4, 5.3
- MySQL5.7
- Redis7.0
- Memcached1.6
- Jemalloc5.2.1
- Pure-FTPd1.0.49
- phpMyAdmin4.4.15.10
Image Feature
- Source compiler installation, download the latest and most stable version from the official, security optimization
- Providing multiple PHP versions (PHP-8.1, PHP-8.0, PHP-7.4, PHP-7.3, PHP-7.2, PHP-7.1,PHP-7.0, PHP-5.6, PHP-5.5, PHP-5.4, PHP-5.3)
- Jemalloc optimize MySQL/MariaDB
- Providing add a virtual host script, include Let's Encrypt SSL certificate
- Add ftp acount to manage via the shell script menu
- Provide Apache, MySQL/MariaDB, PHP, Redis, Memcached, phpMyAdmin upgrade script
- Provide local backup and remote backup (rsync between servers), Alibaba cloud OSS backup(Intranet) script
Application installation directories
Install directory
- Apache:
/usr/local/apache - PHP:
/usr/local/php - MySQL:
/usr/local/mysql - Pureftpd:
/usr/local/pureftpd - Redis:
/usr/local/redis - Memcached:
/usr/local/memcached - phpMyAdmin:
/data/wwwroot/default/phpMyAdmin
Data directory
- Database data directory:
/data/mysql - Webroot directory:
/data/wwwroot/www.example.com - Web logs directory:
/data/wwwlogs - Web Context document root:
/data/wwwroot/default - Index demo url:
http://<Public net IP> - PHPINFO url:
http://<Public net IP>/phpinfo.php - Opcache Control Panel url:
http://<Public net IP>/ocp.php - phpMyAdmin install directory:
http://<Public net IP>/phpMyAdmin - PHP xprober url:
http://<Public net IP>/xprober.php
How do use scripts to optimize the parameters
Because this image was build based on 1 Core 1G ECS,the configuration and parameters for MySQL/MariaDB,PHP are original without any change, highly recommended If this is not the case, run the following optimization script:
sudo /root/oneinstack/optimize.sh
- Do not execute bash optimize.sh (or sh) for documentation commands
- It may take 1 minute to wait, please do not interrupt
- This script will automatically optimize MySQL, PHP and other parameters according to the system configuration
[root@WeiLiu ~]# sudo /root/oneinstack/optimize.sh
Shutting down MySQL..                                      [  OK  ]
Starting MySQL.                                            [  OK  ]
Change PHP Version
sudo /root/oneinstack/change_php_version.sh
[root@WeiLiu ~]# sudo /root/oneinstack/change_php_version.sh

#######################################################################
#       OneinStack for CentOS/RedHat 6+ Debian 8+ and Ubuntu 16+      #
#                       Change your PHP version                       #
#       For more information please visit https://oneinstack.com      #
#######################################################################

Current PHP Version: 7.4

Please select a version of the PHP:
         1. php-5.3
         2. php-5.4
         3. php-5.5
         4. php-5.6
         5. php-7.0
         6. php-7.1
         7. php-7.2
         8. php-7.3
         9. php-7.4
        10. php-8.0
        11. php-8.1
        12. php-8.2
        13. php-8.3
Please input a number:(Default 9 press Enter) 10

You have successfully changed to 8.0

[root@WeiLiu ~]# php -v
PHP 8.0.24 (cli) (built: Oct 23 2022 15:32:28) ( NTS )
Copyright (c) The PHP Group
Zend Engine v4.0.24, Copyright (c) Zend Technologies
    with Zend OPcache v8.0.24, Copyright (c), by Zend Technologies
Migrating website from os disk to data disk
If you purchased a data disk (And only one data disk), It is recommended to mount the data disk first, the site content, database storage data cloud disk, If there is no purchase data cloud disk Ignore the tutorial!
sudo /root/oneinstack/move_auto_fdisk.sh
[root@WeiLiu ~]# sudo /root/oneinstack/move_auto_fdisk.sh

#######################################################################
#       OneinStack for CentOS/RedHat 6+ Debian 8+ and Ubuntu 16+      #
#                             Auto fdisk                              #
#######################################################################

Step 1.No lock file, begin to create lock file and continue

Step 2.Begin to check free disk
You have a free disk, Now will fdisk it and mount it
This system have free disk :
/dev/vdb

Step 3.Begin to fdisk free disk

Step 4.Begin to make directory

Step 5.Begin to write configuration to /etc/fstab and mount device

Filesystem      Size  Used Avail Use% Mounted on
devtmpfs        1.8G     0  1.8G   0% /dev
tmpfs           1.8G   24K  1.8G   1% /dev/shm
tmpfs           1.8G  432K  1.8G   1% /run
tmpfs           1.8G     0  1.8G   0% /sys/fs/cgroup
/dev/vda1        50G  8.8G   39G  19% /
tmpfs           361M     0  361M   0% /run/user/0
/dev/vdb1       9.8G   37M  9.3G   1% /data
DB Management
Display DB default root password
sudo grep dbrootpwd /root/oneinstack/options.conf
[root@WeiLiu ~]# sudo grep dbrootpwd /root/oneinstack/options.conf
dbrootpwd='A0R3Ru5Z'  #Tip: Random Password
Change DB root password
sudo /root/oneinstack/reset_db_root_password.sh
[root@WeiLiu ~]# sudo grep dbrootpwd /root/oneinstack/options.conf
dbrootpwd='A0R3Ru5Z'
[root@WeiLiu ~]# sudo /root/oneinstack/reset_db_root_password.sh

#######################################################################
#       OneinStack for CentOS/RedHat 7+ Debian 9+ and Ubuntu 16+      #
#              Reset Database root password for OneinStack            #
#       For more information please visit https://oneinstack.com      #
#######################################################################

Please input the root password of database: VrTN4k5PYHsw

Password reset succesfully!
The new password: VrTN4k5PYHsw

[root@WeiLiu ~]# mysql -uroot -p
Enter password:  #Tip: Enter the database root password, it will not be displayed on the screen when entering

MySQL [(none)]>
Create a database
Method 1: Command line creation
e.g.: Create a database name oneinstack
mysql -uroot –p
Enter password:
MySQL [(none)]> create database oneinstack;
MySQL [(none)]> show databases;
MySQL [(none)]> exit;
[root@WeiLiu ~]# mysql -uroot -p
Enter password:

MySQL [(none)]> create database oneinstack;
Query OK, 1 row affected (0.01 sec)

MySQL [(none)]> show databases;
+--------------------+
| Database           |
+--------------------+
| information_schema |
| mysql              |
| oneinstack         |
| performance_schema |
| sys                |
+--------------------+
5 rows in set (0.00 sec)

MySQL [(none)]> exit;
Bye
Method 2: Via phpMyAdmin
Use following URL to open phpMyAdmin page: http://<Public net IP>/phpMyAdmin
The browser recommends using Google or Firefox, otherwise it may report an error, phpMyAdmin is case-sensitive.
Delete a database
Method 1: Command line delete
e.g.: Delete a database name oneinstack
mysql -uroot –p
Enter password:
MySQL [(none)]> drop database oneinstack;
MySQL [(none)]> show databases;
MySQL [(none)]> exit;
[root@WeiLiu ~]# mysql -uroot -p
Enter password:

MySQL [(none)]> show databases;
+--------------------+
| Database           |
+--------------------+
| information_schema |
| mysql              |
| oneinstack         |
| performance_schema |
| sys                |
+--------------------+
5 rows in set (0.00 sec)

MySQL [(none)]> drop database oneinstack;
Query OK, 0 rows affected (0.00 sec)

MySQL [(none)]> show databases;
+--------------------+
| Database           |
+--------------------+
| information_schema |
| mysql              |
| performance_schema |
| sys                |
+--------------------+
4 rows in set (0.00 sec)

MySQL [(none)]> exit;
Bye
Method 2: Via phpMyAdmin
Use following URL to open phpMyAdmin page: http://<Public net IP>/phpMyAdmin
The browser recommends using Google or Firefox, otherwise it may report an error, phpMyAdmin is case-sensitive.
Create a database user
For security purposes, we usually create a unique database connection account for each web application(Account name can not be root).
E.g:add a user named: db_user,password: 123456, Authorization for the localhost to the oneinstack database all permissions, the commands are as follows:
mysql -uroot -p #Tip: Enter mysql console
Enter password: #Tip: Enter mysql root password
MySQL [(none)]> grant all privileges on db_name.* to db_user@'localhost' identified by 'db_pass';
MySQL [(none)]> flush privileges;
MySQL [(none)]> exit; #Tip: quit mysql console,Notice the semicolon at the end
[root@WeiLiu ~]# mysql -uroot -p
Enter password:

MySQL [(none)]> grant all privileges on db_name.* to db_user@'localhost' identified by 'db_pass';
Query OK, 0 rows affected, 2 warnings (0.01 sec)

MySQL [(none)]> flush privileges;
Query OK, 0 rows affected (0.00 sec)

MySQL [(none)]> exit;
Bye
How to setup a remote DB connection
For security reasons, OneinStack only allows the cloud host localhost to connect to the database,if you need a remote connection to the database,the following operations are required:
The cloud host security group port, iptables (some cloud hosts do not have iptables enabled and can be skipped), and grant authorized users are indispensable.
1. You must open port 3306 for Security groups
Security groups document URL: Alibabacloud Security group
2. Open iptables port 3306
V2.0 or later, iptables is not enabled, please ignore this step 2
Reference: About iptables firewall
3. Database authorization
Create a new account for remote connection (the account name cannot be root, the remote database account is not recommended to be root, if you need root remote connection, please update the corresponding row of the mysql.user table).
e.g.: Add a user named db_user, password db_pass,Authorized as % (% Represents all ip can connect, you can set the designated ip) db_name database all authority, the commands are as follows
mysql -uroot -p
MySQL [(none)]> grant all privileges on db_name.* to db_user@'%' identified by 'db_pass';
MySQL [(none)]> flush privileges;
MySQL [(none)]> exit;
[root@WeiLiu ~]# mysql -uroot -p
Enter password:

MySQL [(none)]> grant all privileges on db_name.* to db_user@'%' identified by 'db_pass';
Query OK, 0 rows affected, 2 warnings (0.01 sec)

MySQL [(none)]> flush privileges;
Query OK, 0 rows affected (0.00 sec)

MySQL [(none)]> exit;
Bye
How to manage virtual host
How to add a virtual host
sudo /root/oneinstack/vhost.sh
[root@WeiLiu ~]# sudo /root/oneinstack/vhost.sh

#######################################################################
#       OneinStack for CentOS/RedHat 7+ Debian 9+ and Ubuntu 16+      #
#       For more information please visit https://oneinstack.com      #
#######################################################################

What Are You Doing?
        1. Use HTTP Only
        2. Use your own SSL Certificate and Key
        3. Use Let's Encrypt to Create SSL Certificate and Key
        q. Exit
Please input the correct option: 3

Please input domain(example: www.example.com): demo.linuxeye.com
domain=demo.linuxeye.com

Please input the directory for the domain:demo.linuxeye.com :
(Default directory: /data/wwwroot/demo.linuxeye.com):
Virtual Host Directory=/data/wwwroot/demo.linuxeye.com

Create Virtul Host directory......
set permissions of Virtual Host directory......

Do you want to add more domain name? [y/n]: y

Type domainname or IP(example: example.com other.example.com): demo2.linuxeye.com
domain list=demo2.linuxeye.com

Please select domain cert key length.
Enter one of 2048, 3072, 4096, 8192 will issue a RSA cert.
Enter one of ec-256, ec-384, ec-521 will issue a ECC cert.

Please enter your cert key length (default 2048): 2048

Please enter your email: lj2007331@mail.com

[Sun Oct 30 04:27:06 PM CST 2022] Create account key ok.
[Sun Oct 30 04:27:06 PM CST 2022] No EAB credentials found for ZeroSSL, let's get one
[Sun Oct 30 04:27:13 PM CST 2022] Registering account: https://acme.zerossl.com/v2/DV90
[Sun Oct 30 04:27:15 PM CST 2022] Could not get nonce, let's try again.
[Sun Oct 30 04:27:39 PM CST 2022] Registered
[Sun Oct 30 04:27:39 PM CST 2022] ACCOUNT_THUMBPRINT='LMG4Elq-AFm-IH17QAk3yjmp-8TNoxi__gWTIIT1tzY'
....
[Sun Oct 30 04:28:20 PM CST 2022] Cert success.

Syntax OK
Restart Apache......

Allow Apache access_log? [y/n]: y
You access log file=/data/wwwlogs/demo.linuxeye.com_apache.log

#######################################################################
#       OneinStack for CentOS/RedHat 7+ Debian 9+ and Ubuntu 16+      #
#       For more information please visit https://oneinstack.com      #
#######################################################################
Your domain:                  demo.linuxeye.com
Virtualhost conf:             /usr/local/apache/conf/vhost/demo.linuxeye.com.conf
Directory of:                 /data/wwwroot/demo.linuxeye.com
Let's Encrypt SSL Certificate:/usr/local/apache/conf/ssl/demo.linuxeye.com.crt
SSL Private Key:              /usr/local/apache/conf/ssl/demo.linuxeye.com.key
The above Directory of is the website root directory (/data/wwwroot/demo.linuxeye.com), which will be automatically created after the script is executed. Please upload the code to this directory when deploying the website (directory, subdirectory and file permissions are: www)
- Apache the configuration file path:
/usr/local/apache/conf/vhost/demo.linuxeye.com.confApache.htaccessfile path:/data/wwwroot/demo.linuxeye.com
How to delete a virtual host
sudo /root/oneinstack/vhost.sh --del
[root@WeiLiu ~]# sudo /root/oneinstack/vhost.sh --del

#######################################################################
#       OneinStack for CentOS/RedHat 7+ Debian 9+ and Ubuntu 16+      #
#       For more information please visit https://oneinstack.com      #
#######################################################################

Virtualhost list:
demo1.linuxeye.com demo.linuxeye.com www.linuxeye.com

Please input a domain you want to delete: demo.linuxeye.com

Do you want to delete Virtul Host directory? [y/n]: y
Press Ctrl+c to cancel or Press any key to continue...

Domain: demo.linuxeye.com has been deleted.
How to manage fto user accounts
sudo /root/oneinstack/pureftpd_vhost.sh
[root@WeiLiu ~]# sudo /root/oneinstack/pureftpd_vhost.sh

#######################################################################
#       OneinStack for CentOS/RedHat 7+ Debian 9+ and Ubuntu 16+      #
#                 FTP virtual user account management                 #
#       For more information please visit https://oneinstack.com      #
#######################################################################

What Are You Doing?
        1. UserAdd      #Tip: Add Ftp account
        2. UserMod      #Tip: Change the webroot directory permissions of an Ftp account
        3. UserPasswd   #Tip: Change a ftp password
        4. UserDel      #Tip: Delete a ftp account
        5. ListAllUser  #Tip: List all Ftp accounts
        6. ShowUser     #Tip: Display a Ftp account details
        q. Exit         #Tip: Quit
Please input the correct option: 1

Please input a username: ftpuser

Please input the password: UArUDjLZ12HD

Please input the directory(Default directory: /data/wwwroot):    #Tip: ftpuser webroot directory, it is recommended to default, you can directly press Enter.
Password:
Enter it again:
#####################################

[ftpuser] create successful!

You user name is : ftpuser
You Password is : UArUDjLZ12HD
You directory is : /data/wwwroot
It is recommended that the local PC use the "Filezilla" client to log in to the Ftp server.
How to backup
Backup Set Parameters
sudo /root/oneinstack/backup_setup.sh
[root@WeiLiu ~]# sudo /root/oneinstack/backup_setup.sh

#######################################################################
#       OneinStack for CentOS/RedHat 7+ Debian 9+ and Ubuntu 16+      #
#                     Setup the backup parameters                     #
#       For more information please visit https://oneinstack.com      #
#######################################################################

Please select your backup destination:
        1. Localhost
        2. Remote host
        3. Aliyun OSS
        4. Qcloud COS
        5. UPYUN
        6. QINIU
        7. Amazon S3
        8. Dropbox
Please input numbers:(Default 1 press Enter) 1

Please select your backup content:
        1. Only Database
        2. Only Website
        3. Database and Website
Please input a number:(Default 1 press Enter) 1

Please enter the directory for save the backup file:
(Default directory: /data/backup):

Please enter a valid backup number of days:
(Default days: 5): 10

Please enter one or more name for database, separate multiple database names with commas:
(Default database: linuxeye,oneinstack) oneinstack,linuxeye

You have to backup the content:
Database: oneinstack,linuxeye
Perform the backup immediately
sudo /root/oneinstack/backup.sh
** Setup scheduled tasks to automatically schedule backup **
sudo echo '0 1 * * * sudo /root/oneinstack/backup.sh > /dev/null 2>&1' >> /var/spool/cron/root
Do not repeat the above command.
View the local backup
ls -l /data/backup
[root@WeiLiu ~]# ls -l /data/backup/
total 12
-rw-r--r-- 1 root root 637 Oct 30 19:15 DB_linuxeye_20221030_191506.tgz
-rw-r--r-- 1 root root 258 Oct 30 19:15 db.log
-rw-r--r-- 1 root root 641 Oct 30 19:15 DB_oneinstack_20221030_191506.tgz
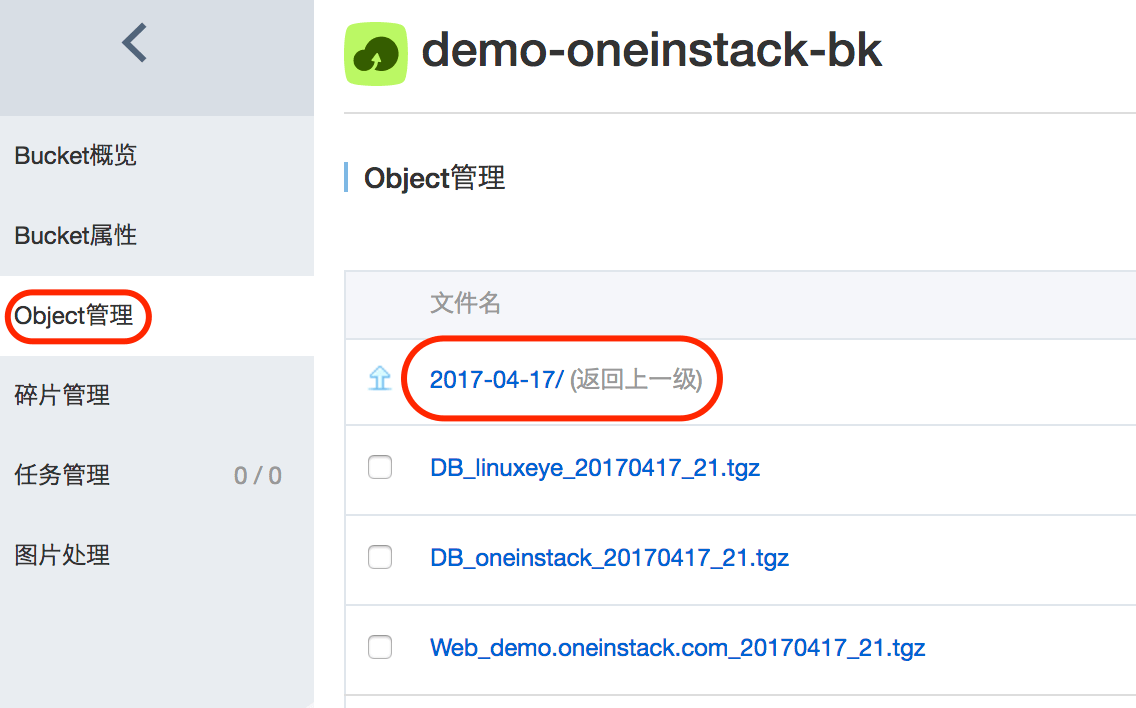
If you set up remote cloud storage backup, view a cloud storage
** Login to a cloud management console **
As shown below:
How to manage service
- Systemd
- Service
systemctl {start|stop|status|restart|reload} httpd
systemctl {start|stop|restart|reload|status} php-fpm
systemctl {start|stop|restart|status} mysqld
systemctl {start|stop|restart|status} pureftpd
systemctl {start|stop|status|restart|reload} redis-server
systemctl {start|stop|status|restart|reload} memcached
service httpd {start|stop|status|restart|reload}
service php-fpm {start|stop|restart|reload|status}
service mysqld {start|stop|restart|status}
service pureftpd {start|stop|restart|status}
service redis-server {start|stop|status|restart|reload}
service memcached {start|stop|status|restart|reload}
How to upgrade
sudo /root/oneinstack/upgrade.sh
[root@WeiLiu ~]# sudo /root/oneinstack/upgrade.sh -h
#######################################################################
#       OneinStack for CentOS/RedHat 7+ Debian 9+ and Ubuntu 16+      #
#              Upgrade Software versions for OneinStack               #
#       For more information please visit https://oneinstack.com      #
#######################################################################

Usage: /root/oneinstack/upgrade.sh  command ...[version]....
  --help, -h                  Show this help message
  --nginx        [version]    Upgrade Nginx
  --tengine      [version]    Upgrade Tengine
  --openresty    [version]    Upgrade OpenResty
  --apache       [version]    Upgrade Apache
  --tomcat       [version]    Upgrade Tomcat
  --db           [version]    Upgrade MySQL/MariaDB/Percona
  --php          [version]    Upgrade PHP
  --redis        [version]    Upgrade Redis
  --memcached    [version]    Upgrade Memcached
  --phpmyadmin   [version]    Upgrade phpMyAdmin
  --oneinstack                Upgrade OneinStack latest
  --acme.sh                   Upgrade acme.sh latest

[root@WeiLiu ~]# sudo /root/oneinstack/upgrade.sh

#######################################################################
#       OneinStack for CentOS/RedHat 7+ Debian 9+ and Ubuntu 16+      #
#              Upgrade Software versions for OneinStack               #
#       For more information please visit https://oneinstack.com      #
#######################################################################

What Are You Doing?
         1. Upgrade Nginx/Tengine/OpenResty
         2. Upgrade Apache
         3. Upgrade Tomcat
         4. Upgrade MySQL/MariaDB/Percona
         5. Upgrade PHP
         6. Upgrade Redis
         7. Upgrade Memcached
         8. Upgrade phpMyAdmin
         9. Upgrade OneinStack latest
        10. Upgrade acme.sh latest
         q. Exit

Please input the correct option: q
How to add extensions
Add PHP Extensions
e.g.: To add a swoole extension, use the following command:
sudo /root/oneinstack/install.sh --php_extensions swoole
Execute sudo /root/oneinstack/install.sh --help to see supported extensions
Add addons component
sudo /root/oneinstack/addons.sh
Execute sudo /root/oneinstack/addons.sh --help to view supported parameters
[root@WeiLiu ~]# sudo /root/oneinstack/addons.sh -h

#######################################################################
#       OneinStack for CentOS/RedHat 7+ Debian 9+ and Ubuntu 16+      #
#                    Install/Uninstall Extensions                     #
#       For more information please visit https://oneinstack.com      #
#######################################################################

Usage: /root/oneinstack/addons.sh  command ...
  --help, -h                  Show this help message
  --install, -i               Install
  --uninstall, -u             Uninstall
  --composer                  Composer
  --fail2ban                  Fail2ban
  --ngx_lua_waf               Ngx_lua_waf

[root@WeiLiu ~]# sudo /root/oneinstack/addons.sh

#######################################################################
#       OneinStack for CentOS/RedHat 7+ Debian 9+ and Ubuntu 16+      #
#                    Install/Uninstall Extensions                     #
#       For more information please visit https://oneinstack.com      #
#######################################################################

What Are You Doing?
        1. Install/Uninstall PHP Composer
        2. Install/Uninstall fail2ban
        3. Install/Uninstall ngx_lua_waf
        q. Exit
Please input the correct option: 3

Please select an action:
        1. install
        2. uninstall
Please input a number:(Default 1 press Enter) 1
How to uninstall
sudo /root/oneinstack/uninstall.sh
Some items can be uninstalled separately. For example, if the database uses a cloud vendor RDS, the database can be uninstalled separately. Pay attention to backing up the data.
[root@WeiLiu ~]# sudo /root/oneinstack/uninstall.sh -h
#######################################################################
#       OneinStack for CentOS/RedHat 7+ Debian 9+ and Ubuntu 16+      #
#                         Uninstall OneinStack                        #
#       For more information please visit https://oneinstack.com      #
#######################################################################

Usage: /root/oneinstack/uninstall.sh  command ...[parameters]....
  --help, -h                    Show this help message, More: https://oneinstack.com
  --quiet, -q                   quiet operation
  --all                         Uninstall All
  --web                         Uninstall Nginx/Tengine/OpenResty/Apache/Tomcat
  --mysql                       Uninstall MySQL/MariaDB/Percona
  --postgresql                  Uninstall PostgreSQL
  --mongodb                     Uninstall MongoDB
  --php                         Uninstall PHP (PATH: /usr/local/php)
  --mphp_ver [53~81]            Uninstall another PHP version (PATH: /usr/local/php${mphp_ver})
  --allphp                      Uninstall all PHP
  --phpcache                    Uninstall PHP opcode cache
  --php_extensions [ext name]   Uninstall PHP extensions, include zendguardloader,ioncube,
                                sourceguardian,imagick,gmagick,fileinfo,imap,ldap,calendar,phalcon,
                                yaf,yar,redis,memcached,memcache,mongodb,swoole,xdebug
  --pureftpd                    Uninstall PureFtpd
  --redis                       Uninstall Redis-server
  --memcached                   Uninstall Memcached-server
  --phpmyadmin                  Uninstall phpMyAdmin
  --nodejs                      Uninstall Nodejs (PATH: /usr/local/node)

[root@WeiLiu ~]# sudo /root/oneinstack/uninstall.sh

#######################################################################
#       OneinStack for CentOS/RedHat 7+ Debian 9+ and Ubuntu 16+      #
#                         Uninstall OneinStack                        #
#       For more information please visit https://oneinstack.com      #
#######################################################################

What Are You Doing?
         0. Uninstall All
         1. Uninstall Nginx/Tengine/OpenResty/Apache/Tomcat
         2. Uninstall MySQL/MariaDB/Percona
         3. Uninstall PostgreSQL
         4. Uninstall MongoDB
         5. Uninstall all PHP
         6. Uninstall PHP opcode cache
         7. Uninstall PHP extensions
         8. Uninstall PureFtpd
         9. Uninstall Redis
        10. Uninstall Memcached
        11. Uninstall phpMyAdmin
        12. Uninstall Nodejs (PATH: /usr/local/node)
         q. Exit

Please input the correct option: q
More
How to deploy a php website on a server
- Create the database required for the site, reference《Create a database》
- Add a virtual host, reference 《How to add a virtual host》Create PHP vhost
- Create an FTP account, reference《How to manage FTP accounts》
- Deploy the code to the site webroot directory
Ftp upload code do not need to modify permissions,default is already www; Download the code in server, you must modify the site root and subdirectories,Directory file permissions are www; If there is a problem with site permissions,Please refer to《About site root permissions》
[root@WeiLiu ~]# cd /root/oneinstack/src/
[root@WeiLiu src]# wget hhttps://wordpress.org/latest.zip
[root@WeiLiu src]# tar xzf latest.zip
[root@WeiLiu src]# mv wordpress/* /data/wwwroot/demo.linuxeye.com/
[root@WeiLiu src]# chown -R www.www /data/wwwroot/demo.linuxeye.com/
[root@WeiLiu src]# ls -al /data/wwwroot/demo.linuxeye.com/
total 220
drwxr-xr-x  5 www www  4096 Oct 30 19:17 .
drwxr-xr-x  5 www www  4096 Oct 30 16:54 ..
-rw-r--r--  1 www www   405 Feb  6  2020 index.php
-rw-r--r--  1 www www 19915 Oct 18 07:08 license.txt
-rw-r--r--  1 www www  7401 Oct 18 07:08 readme.html
-rw-r--r--  1 www www  7165 Jan 21  2021 wp-activate.php
drwxr-xr-x  9 www www  4096 Oct 18 07:00 wp-admin
-rw-r--r--  1 www www   351 Feb  6  2020 wp-blog-header.php
-rw-r--r--  1 www www  2338 Nov 10  2021 wp-comments-post.php
-rw-r--r--  1 www www  3001 Oct 18 07:08 wp-config-sample.php
drwxr-xr-x  5 www www  4096 Oct 18 07:09 wp-content
-rw-r--r--  1 www www  3943 Apr 28  2022 wp-cron.php
drwxr-xr-x 26 www www 12288 Oct 18 07:09 wp-includes
-rw-r--r--  1 www www  2494 Mar 20  2022 wp-links-opml.php
-rw-r--r--  1 www www  3973 Apr 12  2022 wp-load.php
-rw-r--r--  1 www www 48498 Apr 29  2022 wp-login.php
-rw-r--r--  1 www www  8522 Oct 17 20:20 wp-mail.php
-rw-r--r--  1 www www 23706 Apr 12  2022 wp-settings.php
-rw-r--r--  1 www www 32051 Apr 11  2022 wp-signup.php
-rw-r--r--  1 www www  4817 Oct 17 20:29 wp-trackback.php
-rw-r--r--  1 www www  3236 Jun  9  2020 xmlrpc.php
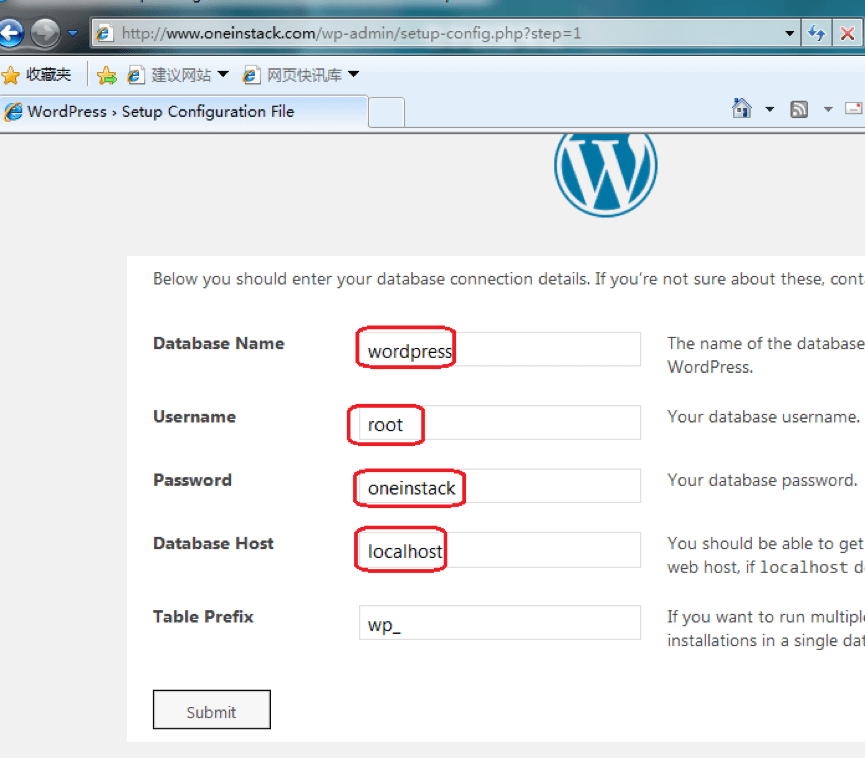
Access http://demo.linuxeye.com,enter the database address (localhost), username (root), password (database root password).
As shown below::
About the php opcode cache
By default, in order to reduce PHP compilation time and improve performance (Opcache is strongly enabled in the production environment), the PHP environment provided by default loads the Opcache module (PHP5.5 and above).
However, it will take 2 to 3 minutes to take effect after the PHP code is updated, which affects work efficiency. During the website debugging stage, it is recommended that you close it or refresh the cache every time there is a code update. Recommended method 2
Method 1: Uninstall Opcache
sudo /root/oneinstack/uninstall.sh --phpcache
[root@WeiLiu ~]# sudo /root/oneinstack/uninstall.sh --phpcache

#######################################################################
#       OneinStack for CentOS/RedHat 7+ Debian 9+ and Ubuntu 16+      #
#                         Uninstall OneinStack                        #
#       For more information please visit https://oneinstack.com      #
#######################################################################

Do you want to uninstall? [y/n]: y

PHP opcache module uninstall completed

PHP xcache module does not exist!

PHP apcu module does not exist!

PHP eaccelerator module does not exist!
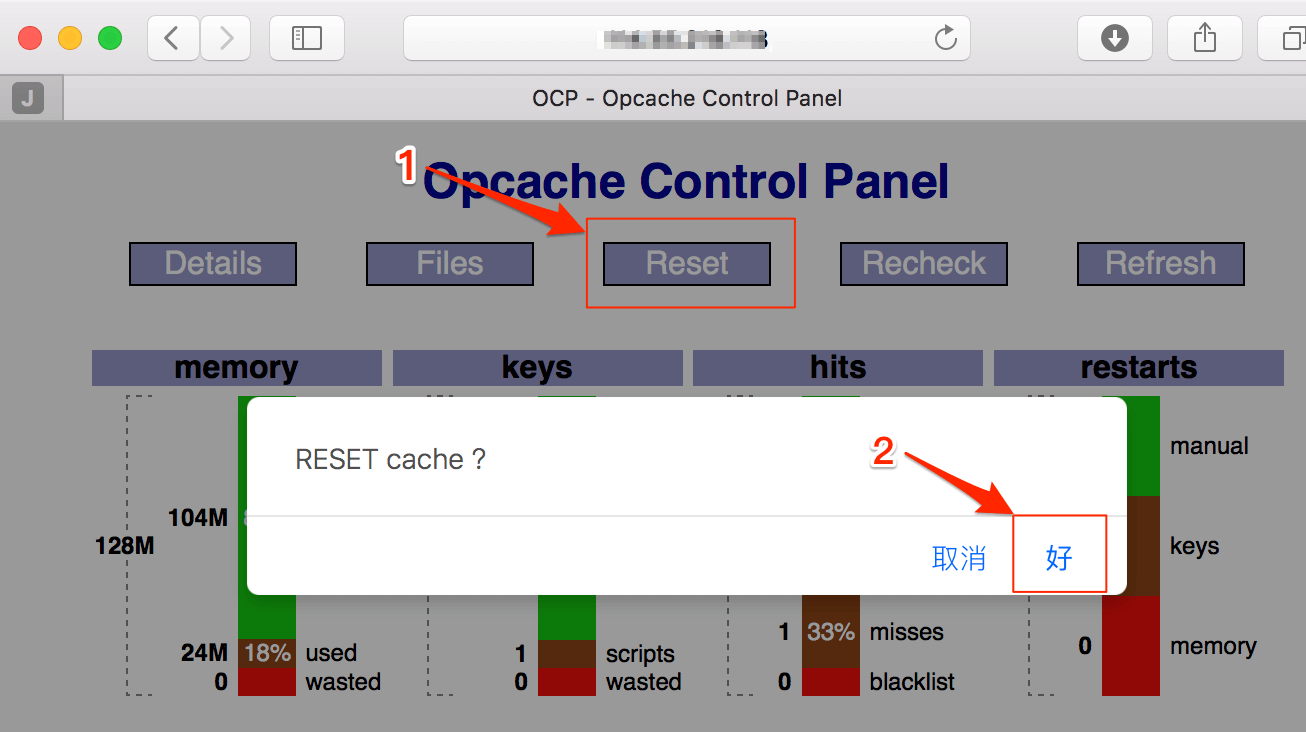
Method 2: Refresh the php cache
Access http://<Public net IP>/ocp.php, Or direct access http://<Public net IP>/ocp.php?RESET=1
As shown below:
About site root permissions
Webroot permissions to follow::
file 644, folder 755, Permissions Users and groups www
If there is a file permissions problem, execute the following three commands:
chown -R www.www /data/wwwroot/
find /data/wwwroot/ -type d -exec chmod 755 {} \;
find /data/wwwroot/ -type f -exec chmod 644 {} \;
About redis and memcached
- Redis default port:
6379 - Memcached default port:
11211 - default only listen IP:
127.0.0.1
How to increase the maximum memory size of Redis?
vi /usr/local/redis/etc/redis.conf
maxmemory 1024000000 #Unit byte
systemctl restart redis-server
How to increase the maximum memory size of Redis?
vi /lib/systemd/system/memcached.service
Environment=CACHESIZE=256 #Unit MB
systemctl daemon-reload
systemctl restart memcached
Change Redis listening port
vi /usr/local/redis/etc/redis.conf
bind 127.0.0.1 change to bind 0.0.0.0
- Systemd
- Service
systemd is the latest initialization system (init) of the Linux system. Its function is to improve the startup speed of the system, start as few processes as possible, and start as many processes as possible concurrently. The corresponding process management command is systemctl, which is supported by CentOS7 and Ubuntu/Debian. It is recommended to use sytemd to manage services.
systemctl restart redis-server
service The service management method used by the old system, such as CentOS5 and 6.
service redis-server restart
Change Memcached listening port
- Systemd
- Service
vi /lib/systemd/system/memcached.service
OPTIONS="-l 127.0.0.1" change to OPTIONS=""
systemctl daemon-reload
systemctl restart memcached
vi /etc/init.d/memcached
OPTIONS="-l 127.0.0.1" change to OPTIONS=""
chkconfig memcached on
service memcached restart
About iptables firewall
By default, 22 (SSH) 80, 443 (Apache), 21, 20000~30000 (FTP) are enabled
V2.0 or later, iptables is disabled
All other ports are rejected. Other ports need to be allowed as follows, such as opening port 8080, please do the following.
- RHEL,Like CentOS
- Ubuntu/Debian
iptables -I INPUT 4 -p tcp -m state --state NEW -m tcp --dport 8080 -j ACCEPT
service iptables save
[root@WeiLiu ~]# iptables -I INPUT 4 -p tcp -m state --state NEW -m tcp --dport 8080 -j ACCEPT
[root@WeiLiu ~]# service iptables save
iptables: Saving firewall rules to /etc/sysconfig/iptables:[  OK  ]
[root@WeiLiu ~]# iptables -nvL
Chain INPUT (policy DROP 14 packets, 586 bytes)
 pkts bytes target     prot opt in     out     source               destination
    0     0 ACCEPT     all  --  lo     *       0.0.0.0/0            0.0.0.0/0
  206 15880 ACCEPT     all  --  *      *       0.0.0.0/0            0.0.0.0/0            state RELATED,ESTABLISHED
    0     0 ACCEPT     tcp  --  *      *       0.0.0.0/0            0.0.0.0/0            state NEW tcp dpt:22
    0     0 ACCEPT     tcp  --  *      *       0.0.0.0/0            0.0.0.0/0            state NEW tcp dpt:8080
    0     0 ACCEPT     tcp  --  *      *       0.0.0.0/0            0.0.0.0/0            state NEW tcp dpt:80
    0     0 ACCEPT     tcp  --  *      *       0.0.0.0/0            0.0.0.0/0            state NEW tcp dpt:443
    0     0 ACCEPT     tcp  --  *      *       0.0.0.0/0            0.0.0.0/0            state NEW tcp dpt:21
    0     0 ACCEPT     tcp  --  *      *       0.0.0.0/0            0.0.0.0/0            state NEW tcp dpts:20000:30000
   29   812 ACCEPT     icmp --  *      *       0.0.0.0/0            0.0.0.0/0            icmptype 8

Chain FORWARD (policy ACCEPT 0 packets, 0 bytes)
 pkts bytes target     prot opt in     out     source               destination

Chain OUTPUT (policy ACCEPT 219 packets, 38990 bytes)
 pkts bytes target     prot opt in     out     source               destination

Chain syn-flood (0 references)
 pkts bytes target     prot opt in     out     source               destination
iptables -I INPUT 4 -p tcp -m state --state NEW -m tcp --dport 8080 -j ACCEPT
iptables-save > /etc/iptables.up.rules
[root@WeiLiu ~]# iptables -I INPUT 4 -p tcp -m state --state NEW -m tcp --dport 8080 -j ACCEPT
[root@WeiLiu ~]# iptables-save > /etc/iptables.up.rules
[root@WeiLiu ~]# iptables -nvL
Chain INPUT (policy DROP 20 packets, 1186 bytes)
 pkts bytes target     prot opt in     out     source               destination
    0     0 ACCEPT     all  --  lo     *       0.0.0.0/0            0.0.0.0/0
  206 15880 ACCEPT     all  --  *      *       0.0.0.0/0            0.0.0.0/0            state RELATED,ESTABLISHED
    0     0 ACCEPT     tcp  --  *      *       0.0.0.0/0            0.0.0.0/0            state NEW tcp dpt:22
    0     0 ACCEPT     tcp  --  *      *       0.0.0.0/0            0.0.0.0/0            state NEW tcp dpt:8080
    0     0 ACCEPT     tcp  --  *      *       0.0.0.0/0            0.0.0.0/0            state NEW tcp dpt:80
    0     0 ACCEPT     tcp  --  *      *       0.0.0.0/0            0.0.0.0/0            state NEW tcp dpt:443
    0     0 ACCEPT     tcp  --  *      *       0.0.0.0/0            0.0.0.0/0            state NEW tcp dpt:21
    0     0 ACCEPT     tcp  --  *      *       0.0.0.0/0            0.0.0.0/0            state NEW tcp dpts:20000:30000
   29   812 ACCEPT     icmp --  *      *       0.0.0.0/0            0.0.0.0/0            icmptype 8

Chain FORWARD (policy ACCEPT 0 packets, 0 bytes)
 pkts bytes target     prot opt in     out     source               destination

Chain OUTPUT (policy ACCEPT 219 packets, 38990 bytes)
 pkts bytes target     prot opt in     out     source               destination

Chain syn-flood (0 references)
 pkts bytes target     prot opt in     out     source               destination