LNMP环境镜像使用手册
简介
- 支持备份(包含本地、远程、OSS、COS、七牛云、upyun)等功能
- 未经容许,禁止盗用图片,文档和代码不能复制传播
- 快速部署PHP网站,参考:如何部署一个PHP网站?
- 注意安全组端口(80、443、21、20000~30000)是否打开,参考:云主机安全组端口开放教程
腾讯云Ubuntu服务器默认ssh账号 ubuntu ,必须 sudo su - 命令切换至 root,脚本位置:/root/oneinstack
镜像说明
版本说明
软件版本详细
- Nginx1.22
- PHP8.1, 8.0, 7.4, 7.3, 7.2, 7.1, 7.0, 5.6, 5.5, 5.4, 5.3
- MySQL5.7
- Redis7.0
- Memcached1.6
- Jemalloc5.2.1
- Pure-FTPd1.0.49
- phpMyAdmin4.4.15.10
功能亮点
- 基于源码编译安装,细节安全优化,纯命令行,占用系统资源低
- 源码编译安装,细节安全优化,纯命令行,占用系统资源低
- 支持切换至8.1、8.0、7.4、7.3、7.2、7.1、7.0、5.6、5.5、5.4、5.3任意版本
- jemalloc优化Nginx、MySQL内存管理
- 交互添加Nginx虚拟主机,方便快捷, 内置Let's Encrypt
- 菜单式FTP账号管理脚本,轻松建立ftp虚拟用户
- 提供在线Nginx、MySQL、PHP、Redis、Memcached、phpMyAdmin升级脚本
- 提供本地备份和远程备份(服务器之间rsync)、OSS、COS、UPYUN备份功能
目录说明
源码安装目录
- Nginx:
/usr/local/nginx - PHP:
/usr/local/php - MySQL:
/usr/local/mysql - Pureftpd:
/usr/local/pureftpd - Redis:
/usr/local/redis - Memcached:
/usr/local/memcached - phpMyAdmin:
/data/wwwroot/default/phpMyAdmin
数据存储目录
- 数据库(MySQL):
/data/mysql - 网站根目录:
/data/wwwroot/www.example.com#添加虚拟主机会自动创建这个目录 - Web访问日志:
/data/wwwlogs - 默认ip直接访问内容对应根目录:
/data/wwwroot/default,该目录包含首页demo、Opcache缓存管理、phpinfo、phpmyadmin、探针等文件,目录里面文件可删除,目录不能删除。 - 首页demo:
http://公网IP - PHPINFO地址:
http://公网IP/phpinfo.php - Opcache地址:
http://公网IP/ocp.php - phpmyadmin管理地址:
http://公网IP/phpMyAdmin#建议用chrome浏览器,访问注意大小写,为了安全建议重命名或者删除 - PHP运行环境探针地址:
http://公网IP/xprober.php
参数优化
由于镜像制作是下1核1G内存配置完成,Nginx、MySQL、PHP参数还是该配置的参数,强烈建议如果不是这个配置,请执行下面优化脚本:
sudo /root/oneinstack/optimize.sh
- 文档命令请勿bash optimize.sh(或者sh)执行
- 可能需要等待1分钟,请勿中断
- 此脚本会根据系统配置,自动优化Nginx、MySQL、PHP、JVM等参数
[root@OneinStack ~]# sudo /root/oneinstack/optimize.sh
Shutting down MySQL..                                      [  OK  ]
Starting MySQL.                                            [  OK  ]
php版本切换
sudo /root/oneinstack/change_php_version.sh
[root@OneinStack ~]# sudo /root/oneinstack/change_php_version.sh

#######################################################################
#       OneinStack for CentOS/RedHat 6+ Debian 8+ and Ubuntu 16+      #
#                       Change your PHP version                       #
#       For more information please visit https://oneinstack.com      #
#######################################################################

Current PHP Version: 7.4  #注解: 当前PHP版本

Please select a version of the PHP:
         1. php-5.3
         2. php-5.4
         3. php-5.5
         4. php-5.6
         5. php-7.0
         6. php-7.1
         7. php-7.2
         8. php-7.3
         9. php-7.4
        10. php-8.0
        11. php-8.1
Please input a number:(Default 9 press Enter) 10  #注解: 切换至序号11, 即php-8.0

You have successfully changed to 8.0  #注解: 切换成功标示

[root@OneinStack ~]# php -v  #注解: 验证切换后当前PHP版本
PHP 8.0.24 (cli) (built: Oct 23 2022 15:32:28) ( NTS )
Copyright (c) The PHP Group
Zend Engine v4.0.24, Copyright (c) Zend Technologies
    with Zend OPcache v8.0.24, Copyright (c), by Zend Technologies
将网站数据迁移至数据云盘
如果您购买了数据云盘(脚本仅支持未本地挂载磁盘),建议先挂载数据云盘,将网站内容、数据库放在数据云盘中,未购买数据云盘请忽略该教程!
sudo /root/oneinstack/move_auto_fdisk.sh
[root@OneinStack ~]# sudo /root/oneinstack/move_auto_fdisk.sh

#######################################################################
#       OneinStack for CentOS/RedHat 6+ Debian 8+ and Ubuntu 16+      #
#                             Auto fdisk                              #
#       For more information please visit http://oneinstack.com       #
#######################################################################

Step 1.No lock file, begin to create lock file and continue

Step 2.Begin to check free disk
You have a free disk, Now will fdisk it and mount it
This system have free disk :
/dev/vdb

Step 3.Begin to fdisk free disk

Step 4.Begin to make directory

Step 5.Begin to write configuration to /etc/fstab and mount device

Filesystem      Size  Used Avail Use% Mounted on
devtmpfs        1.8G     0  1.8G   0% /dev
tmpfs           1.8G   24K  1.8G   1% /dev/shm
tmpfs           1.8G  432K  1.8G   1% /run
tmpfs           1.8G     0  1.8G   0% /sys/fs/cgroup
/dev/vda1        50G  8.8G   39G  19% /
tmpfs           361M     0  361M   0% /run/user/0
/dev/vdb1       9.8G   37M  9.3G   1% /data
数据库管理
数据库默认root密码
sudo grep dbrootpwd /root/oneinstack/options.conf
[root@OneinStack ~]# sudo grep dbrootpwd /root/oneinstack/options.conf
dbrootpwd='A0R3Ru5Z'  #注解: 数据库root密码为 A0R3Ru5Z
重置数据库root密码
sudo /root/oneinstack/reset_db_root_password.sh
[root@OneinStack ~]# sudo grep dbrootpwd /root/oneinstack/options.conf
dbrootpwd='A0R3Ru5Z'
[root@OneinStack ~]# sudo /root/oneinstack/reset_db_root_password.sh

#######################################################################
#       OneinStack for CentOS/RedHat 7+ Debian 9+ and Ubuntu 16+      #
#              Reset Database root password for OneinStack            #
#       For more information please visit https://oneinstack.com      #
#######################################################################

Please input the root password of database: VrTN4k5PYHsw  #注解: 输入数据库新的root密码,不少于5个字符

Password reset succesfully!  #注解: 成功标识
The new password: VrTN4k5PYHsw

[root@OneinStack ~]# mysql -uroot -p  #注解: 命令行进入MySQL控制台
Enter password:   #注解: 输入数据库root密码,输入时不在屏幕显示

MySQL [(none)]>   #注解: 成功进入MySQL命令行控制台
创建一个数据库
方法一:命令行创建
例:创建 oneinstack 的数据库
mysql -uroot –p #进入数据库控制台
Enter password: #数据库root密码,⚠️输入密码不显示在屏幕上
MySQL [(none)]> create database oneinstack; #特别注意有分号
MySQL [(none)]> show databases; #查看数据库,除oneinstack数据库,其它3个为系统默认库,不能删除
MySQL [(none)]> exit; #退出数据库控制台,特别注意有分号
[root@OneinStack ~]# mysql -uroot -p
Enter password:

MySQL [(none)]> create database oneinstack;  #注解: 创建库名为 oneinstack 的数据库,特别注意有分号
Query OK, 1 row affected (0.01 sec)

MySQL [(none)]> show databases;  #注解: 显示所有数据库,分号结束符
+--------------------+
| Database           |
+--------------------+
| information_schema |
| mysql              |
| oneinstack         |
| performance_schema |
| sys                |
+--------------------+
5 rows in set (0.00 sec)

MySQL [(none)]> exit;  #注解: 退出数据库命令行控制台,分号结束符
Bye
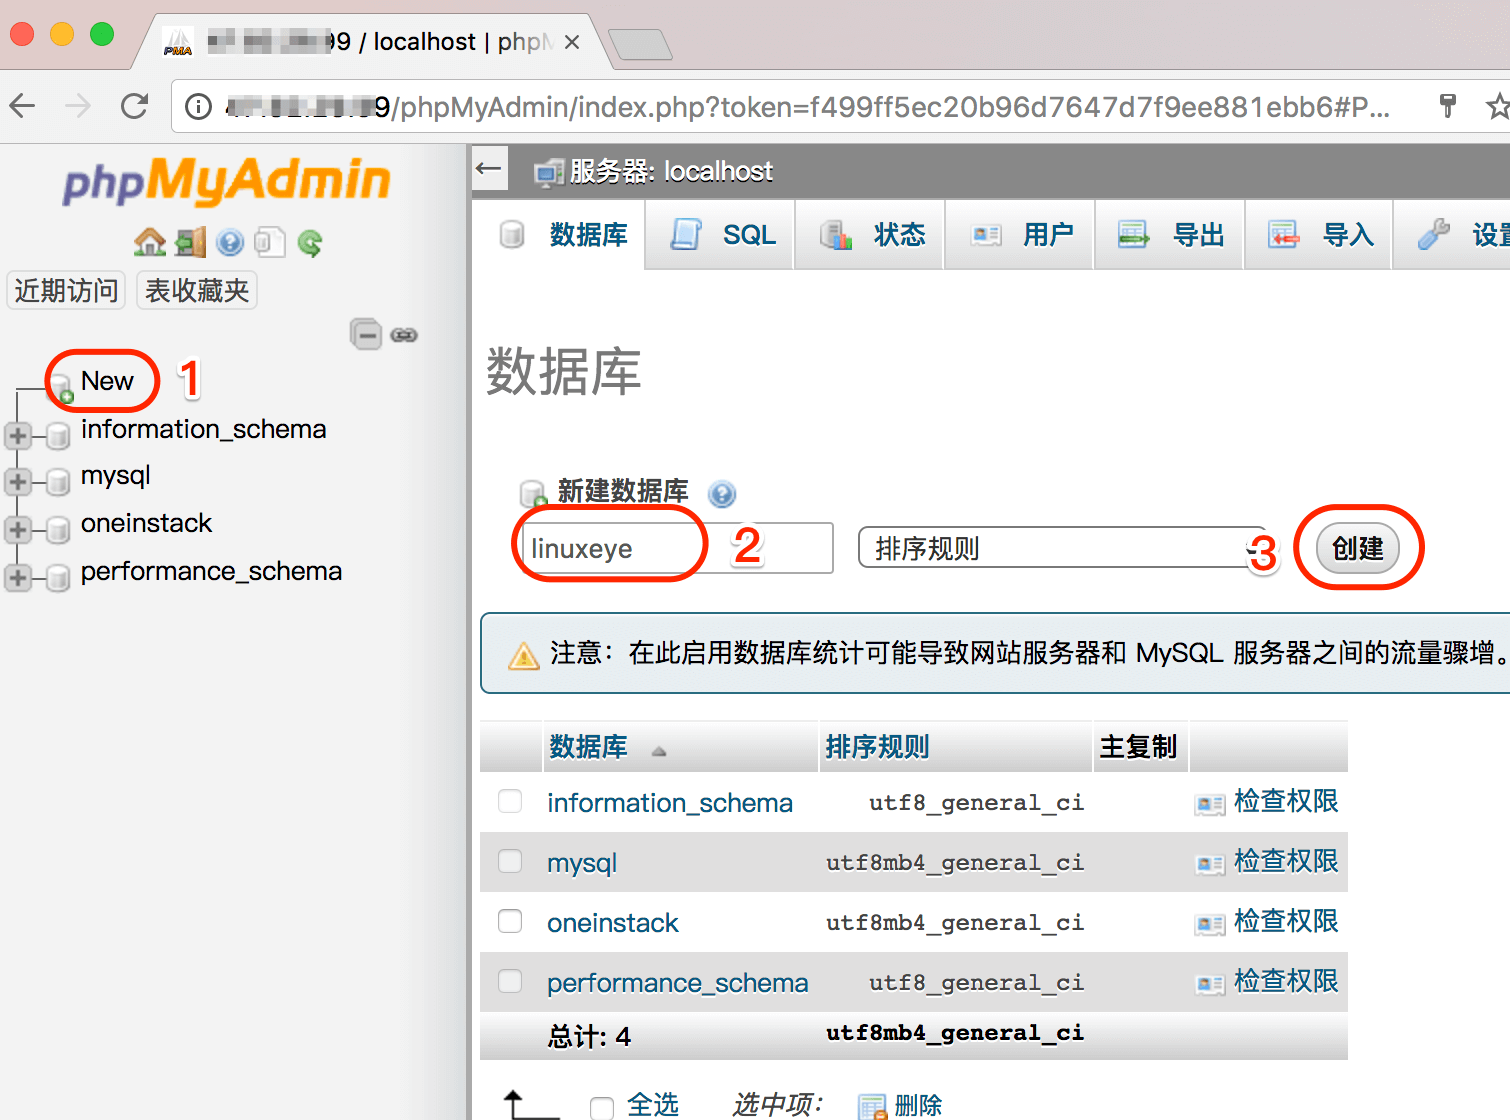
方法二:phpMyAdmin创建
1). 浏览器输入 http://公网IP/phpMyAdmin
浏览器建议用谷歌或火狐,否则可能会报错,注意phpMyAdmin大小写
2). 按照下图创建数据库
如下图:
删除一个数据库
方法一:命令行删除
例:删除 oneinstack 的数据库
mysql -uroot –p #进入数据库控制台
Enter password: #数据库root密码,输入密码不显示在屏幕上
MySQL [(none)]> drop database oneinstack; #删除库名为 oneinstack 的数据库
MySQL [(none)]> show databases; #查看数据库
MySQL [(none)]> exit; #退出数据库控制台,特别注意有分号
[root@OneinStack ~]# mysql -uroot -p
Enter password:

MySQL [(none)]> show databases;
+--------------------+
| Database           |
+--------------------+
| information_schema |
| mysql              |
| oneinstack         |
| performance_schema |
| sys                |
+--------------------+
5 rows in set (0.00 sec)

MySQL [(none)]> drop database oneinstack;  #注解: 删除库名为oneinstack的数据库,其余3个库为MySQL系统库请勿删除,特别注意有分号
Query OK, 0 rows affected (0.00 sec)

MySQL [(none)]> show databases;
+--------------------+
| Database           |
+--------------------+
| information_schema |
| mysql              |
| performance_schema |
| sys                |
+--------------------+
4 rows in set (0.00 sec)

MySQL [(none)]> exit;
Bye
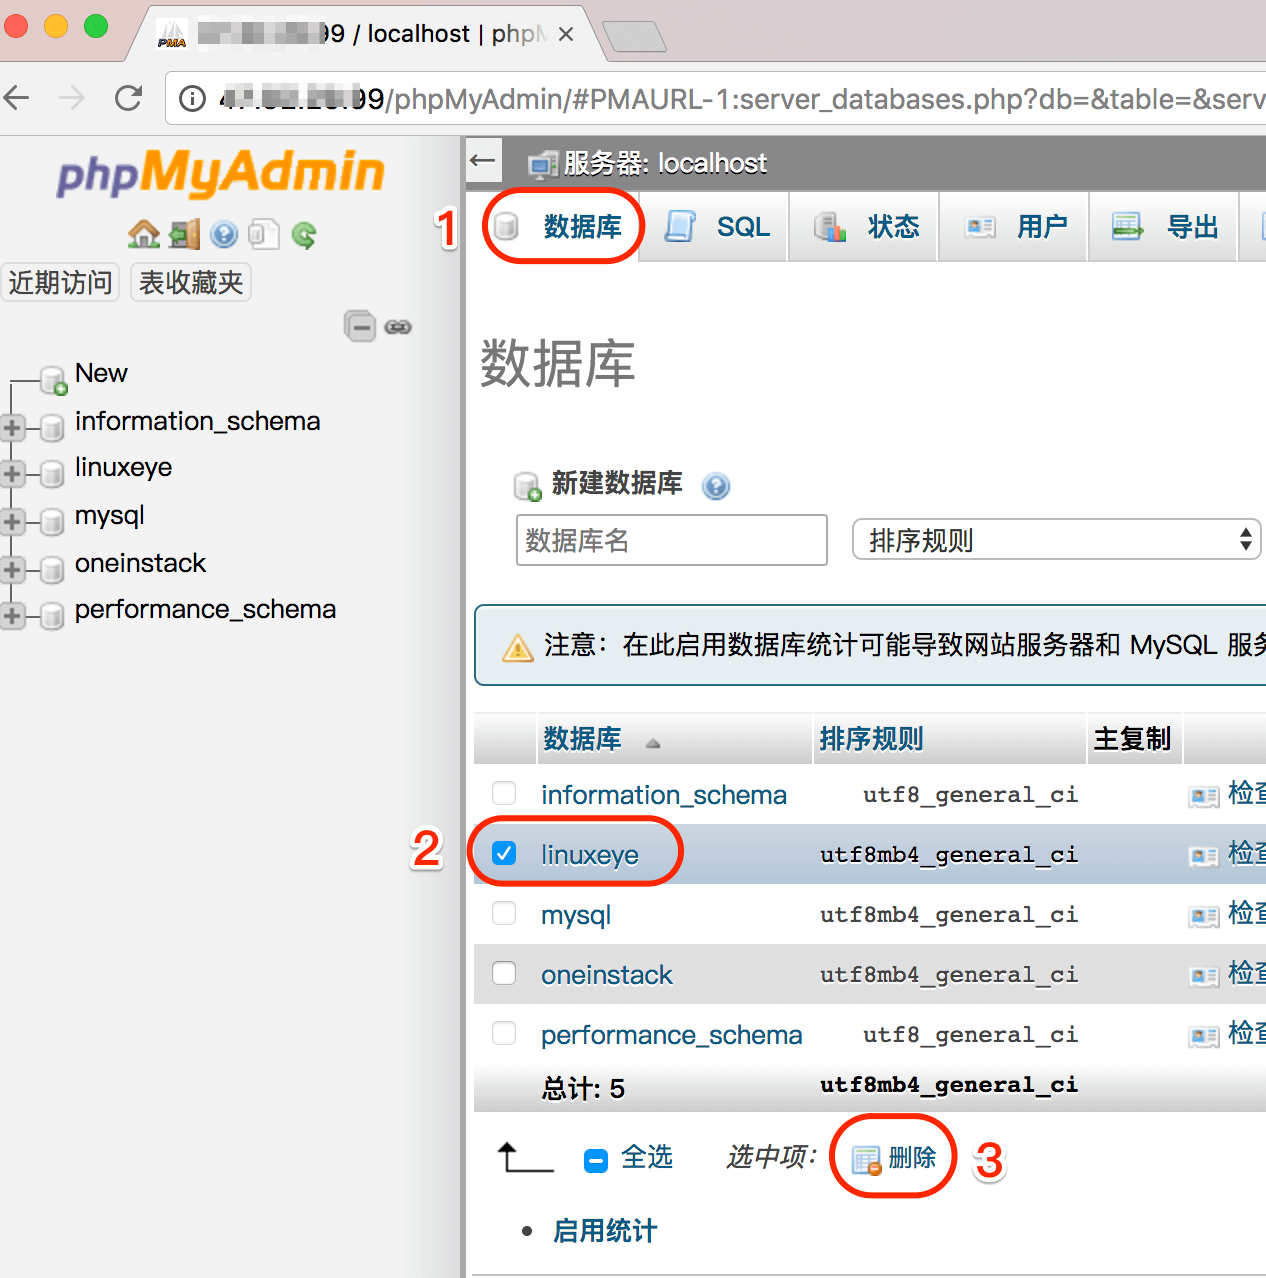
方法二:phpMyAdmin删除
1). 浏览器输入 http://公网IP/phpMyAdmin
浏览器建议用谷歌或火狐,否则可能会报错,注意phpMyAdmin大小写
2). 按照下图创建数据库
如下图:
创建数据库用户
为了安全我们通常给每一个网站程序建立唯一的数据库连接帐号(建议帐号名不要为 root)
例:添加一个用户名为 db_user ,密码为 db_pass ,授权为本机 localhost 对 db_name 数据库所有权限,命令如下:
mysql -uroot -p
Enter password: #输入数据库的root密码,默认不显示密码
MySQL [(none)]> grant all privileges on db_name.* to db_user@'localhost' identified by 'db_pass'; #授权语句,特别注意有分号
MySQL [(none)]> flush privileges; #权限立即生效
MySQL [(none)]> exit; #退出数据库控制台,特别注意有分号
[root@OneinStack ~]# mysql -uroot -p
Enter password:

MySQL [(none)]> grant all privileges on db_name.* to db_user@'localhost' identified by 'db_pass';
Query OK, 0 rows affected, 2 warnings (0.01 sec)

MySQL [(none)]> flush privileges;
Query OK, 0 rows affected (0.00 sec)

MySQL [(none)]> exit;
Bye
如何配置数据库远程连接
为了安全考虑,OneinStack仅允许云主机本机(localhost)连接数据库,如果需要远程连接数据库,需要如下操作:
云主机安全组端口(如云厂商控制台)、iptables(部分云主机没有启用iptables,可跳过)、grant授权用户,缺一不可。
1. 云主机安全组端口开放3306端口
参考文档:《云主机安全组端口开放教程》
2. 打开iptables 3306端口
镜像V2.0以上版本,未开启iptables,请忽略此步骤2
参考: 《关于iptables防火墙》,注意端口号。
3. 数据库授权
远程连接新建一个帐号(帐号名不能为 root, 远程数据库账号不建议 root, 如需root远程连接,请更新 mysql.user表对应行)。
例:添加一个用户名为db_user,密码为db_pass,授权为%(%表示所有外网IP能连接)对db_name数据库所有权限,命令如下:
mysql -uroot -p
MySQL [(none)]> grant all privileges on db_name.* to db_user@'%' identified by 'db_pass'; #授权语句,特别注意有分号
MySQL [(none)]> flush privileges;
MySQL [(none)]> exit; #退出数据库控制台,特别注意有分号
[root@OneinStack ~]# mysql -uroot -p
Enter password:

MySQL [(none)]> grant all privileges on db_name.* to db_user@'%' identified by 'db_pass';
Query OK, 0 rows affected, 2 warnings (0.01 sec)

MySQL [(none)]> flush privileges;
Query OK, 0 rows affected (0.00 sec)

MySQL [(none)]> exit;
Bye
如何管理虚拟主机
添加虚拟主机
sudo /root/oneinstack/vhost.sh
[root@OneinStack ~]# sudo /root/oneinstack/vhost.sh

#######################################################################
#       OneinStack for CentOS/RedHat 7+ Debian 9+ and Ubuntu 16+      #
#       For more information please visit https://oneinstack.com      #
#######################################################################

What Are You Doing?
        1. Use HTTP Only  #注解: 1. 仅配置http
        2. Use your own SSL Certificate and Key  #注解: 2. 自己购买ssl替换,自动配置http、https
        3. Use Let's Encrypt to Create SSL Certificate and Key  #注解: 3. Let's 免费证书,自动配置http、https
        q. Exit  #注解: 4. 退出
Please input the correct option: 3

Please input domain(example: www.example.com): demo.oneinstack.com  #注解: 添加的虚拟主机域名
domain=demo.oneinstack.com

Please input the directory for the domain:demo.oneinstack.com :
(Default directory: /data/wwwroot/demo.oneinstack.com):             #注解: 网站根目录(绝对路径)
Virtual Host Directory=/data/wwwroot/demo.oneinstack.com

Create Virtul Host directory......
set permissions of Virtual Host directory......

Do you want to add more domain name? [y/n]: y  #注解: 是否添加更多域名或IP访问同一个网站根目录

Type domainname or IP(example: example.com other.example.com): demo2.oneinstack.com  #注解: 输入域名或IP(添加多个以空格隔开)
domain list=demo2.oneinstack.com

Do you want to redirect from demo2.oneinstack.com to demo.oneinstack.com? [y/n]: y
#注解: 是否设置301跳转,浏览器访问demo2.oneinstack.com时,强制跳转至demo.oneinstack.com

Do you want to redirect all HTTP requests to HTTPS? [y/n]: y  #注解: 是否设置http强制跳转至https协议

Please select domain cert key length.
Enter one of 2048, 3072, 4096, 8192 will issue a RSA cert.
Enter one of ec-256, ec-384, ec-521 will issue a ECC cert.

Please enter your cert key length (default 2048): 2048  #注解: 申请免费证书加密长度

Please enter your email: lj2007331@mail.com  #注解: 输入邮箱

[Sun Oct 30 04:27:06 PM CST 2022] Create account key ok.
[Sun Oct 30 04:27:06 PM CST 2022] No EAB credentials found for ZeroSSL, let's get one
[Sun Oct 30 04:27:13 PM CST 2022] Registering account: https://acme.zerossl.com/v2/DV90
[Sun Oct 30 04:27:15 PM CST 2022] Could not get nonce, let's try again.
[Sun Oct 30 04:27:39 PM CST 2022] Registered
[Sun Oct 30 04:27:39 PM CST 2022] ACCOUNT_THUMBPRINT='LMG4Elq-AFm-IH17QAk3yjmp-8TNoxi__gWTIIT1tzY'
....
[Sun Oct 30 04:28:20 PM CST 2022] Cert success.

nginx: the configuration file /usr/local/nginx/conf/nginx.conf syntax is ok
nginx: configuration file /usr/local/nginx/conf/nginx.conf test is successful

Do you want to add hotlink protection? [y/n]: n  #注解: 是否设置防盗链

Allow Rewrite rule? [y/n]: y  #注解: 是否设置伪静态

Please input the rewrite of programme :
wordpress,opencart,magento2,drupal,joomla,codeigniter,laravel
thinkphp,pathinfo,discuz,typecho,ecshop,nextcloud,zblog,whmcs rewrite was exist.
(Default rewrite: other): wordpress  #注解: 显示为内置为伪静态规则(可手工输入名字),文件位置:/usr/local/nginx/conf/rewrite/wordpress.conf
You choose rewrite=wordpress

Allow Nginx/Tengine/OpenResty access_log? [y/n]: y  #注解: 是否记录访问日志
You access log file=/data/wwwlogs/demo.oneinstack.com_nginx.log

nginx: the configuration file /usr/local/nginx/conf/nginx.conf syntax is ok
nginx: configuration file /usr/local/nginx/conf/nginx.conf test is successful
Reload Nginx......

#######################################################################
#       OneinStack for CentOS/RedHat 7+ Debian 9+ and Ubuntu 16+      #
#       For more information please visit https://oneinstack.com      #
#######################################################################
Your domain:                  demo.oneinstack.com
Virtualhost conf:             /usr/local/nginx/conf/vhost/demo.oneinstack.com.conf
Directory of:                 /data/wwwroot/demo.oneinstack.com
Rewrite rule:                 /usr/local/nginx/conf/rewrite/wordpress.conf
Let's Encrypt SSL Certificate:/usr/local/nginx/conf/ssl/demo.oneinstack.com.crt
SSL Private Key:              /usr/local/nginx/conf/ssl/demo.oneinstack.com.key
上述Directory of为网站根目录(/data/wwwroot/demo.oneinstack.com),脚本执行后会自动创建,部署网站时请将代码上传到该目录(目录、子目录和文件权限都为:www)
- 对应Nginx配置文件路径:
/usr/local/nginx/conf/vhost/demo.oneinstack.com.conf - 伪静态文件路径:
/usr/local/nginx/conf/rewrite/wordpress.conf
删除虚拟主机
sudo /root/oneinstack/vhost.sh --del
[root@OneinStack ~]# sudo /root/oneinstack/vhost.sh --del

#######################################################################
#       OneinStack for CentOS/RedHat 7+ Debian 9+ and Ubuntu 16+      #
#       For more information please visit https://oneinstack.com      #
#######################################################################

Virtualhost list:  #注解: 已经绑定域名
demo1.oneinstack.com demo.oneinstack.com www.linuxeye.com

Please input a domain you want to delete: demo.oneinstack.com  #注解: 删除demo.oneinstack.com域名虚拟主机

Do you want to delete Virtul Host directory? [y/n]: y  #注解: 是否删除网站根目录,注意备份
Press Ctrl+c to cancel or Press any key to continue...  #注解: 按Ctrl+c取消,人已经继续执行

Domain: demo.oneinstack.com has been deleted.
如何管理FTP账号
sudo /root/oneinstack/pureftpd_vhost.sh
[root@OneinStack ~]# sudo /root/oneinstack/pureftpd_vhost.sh

#######################################################################
#       OneinStack for CentOS/RedHat 7+ Debian 9+ and Ubuntu 16+      #
#                 FTP virtual user account management                 #
#       For more information please visit https://oneinstack.com      #
#######################################################################

What Are You Doing?
        1. UserAdd      #注解: 添加Ftp账号
        2. UserMod      #注解: 更改某个Ftp账号根目录权限
        3. UserPasswd   #注解: 更改某个Ftp密码
        4. UserDel      #注解: 删除某个Ftp账号
        5. ListAllUser  #注解: 列出所有Ftp账号
        6. ShowUser     #注解: 显示某个Ftp账号详情
        q. Exit         #注解: 退出(字母q)
Please input the correct option: 1

Please input a username: ftpuser

Please input the password: UArUDjLZ12HD

Please input the directory(Default directory: /data/wwwroot):    #注解: ftpuser用户根目录,建议默认,可直接回车
Password:
Enter it again:
#####################################

[ftpuser] create successful!

You user name is : ftpuser
You Password is : UArUDjLZ12HD
You directory is : /data/wwwroot
建议本地PC使用《Filezilla》客户端登录Ftp服务器。
如何备份
设置备份参数
sudo /root/oneinstack/backup_setup.sh
[root@OneinStack ~]# sudo /root/oneinstack/backup_setup.sh

#######################################################################
#       OneinStack for CentOS/RedHat 7+ Debian 9+ and Ubuntu 16+      #
#                     Setup the backup parameters                     #
#       For more information please visit https://oneinstack.com      #
#######################################################################

Please select your backup destination:
        1. Localhost     #解析: 1. 本地备份
        2. Remote host   #解析: 2. 远程备份(ssh)
        3. Aliyun OSS    #解析: 3. 阿里云OSS备份
        4. Qcloud COS    #解析: 4. 腾讯云COS备份
        5. UPYUN         #解析: 5. 又拍云备份
        6. QINIU         #解析: 6. 七牛云备份
        7. Amazon S3     #解析: 7. 亚马孙S3备份
        8. Dropbox       #解析: 8. Dropbox备份
Please input numbers:(Default 1 press Enter) 1

Please select your backup content:
        1. Only Database
        2. Only Website
        3. Database and Website
Please input a number:(Default 1 press Enter) 1  #解析: 选择备份数据库

Please enter the directory for save the backup file:
(Default directory: /data/backup):   #解析: 本地或远程备份目录

Please enter a valid backup number of days:
(Default days: 5): 10  #解析: 备份保留天数

Please enter one or more name for database, separate multiple database names with commas:
(Default database: linuxeye,oneinstack) oneinstack,linuxeye  #解析: 备份数据库,以逗号隔开

You have to backup the content:
Database: oneinstack,linuxeye
立即备份
sudo /root/oneinstack/backup.sh
设置计划任务自动定时备份
sudo echo '0 1 * * * sudo /root/oneinstack/backup.sh > /dev/null 2>&1' >> /var/spool/cron/root
上面命令请勿重复执行
查看本地备份
ls -l /data/backup
[root@OneinStack ~]# ls -l /data/backup/
total 12
-rw-r--r-- 1 root root 637 Oct 30 19:15 DB_linuxeye_20221030_191506.tgz
-rw-r--r-- 1 root root 258 Oct 30 19:15 db.log
-rw-r--r-- 1 root root 641 Oct 30 19:15 DB_oneinstack_20221030_191506.tgz
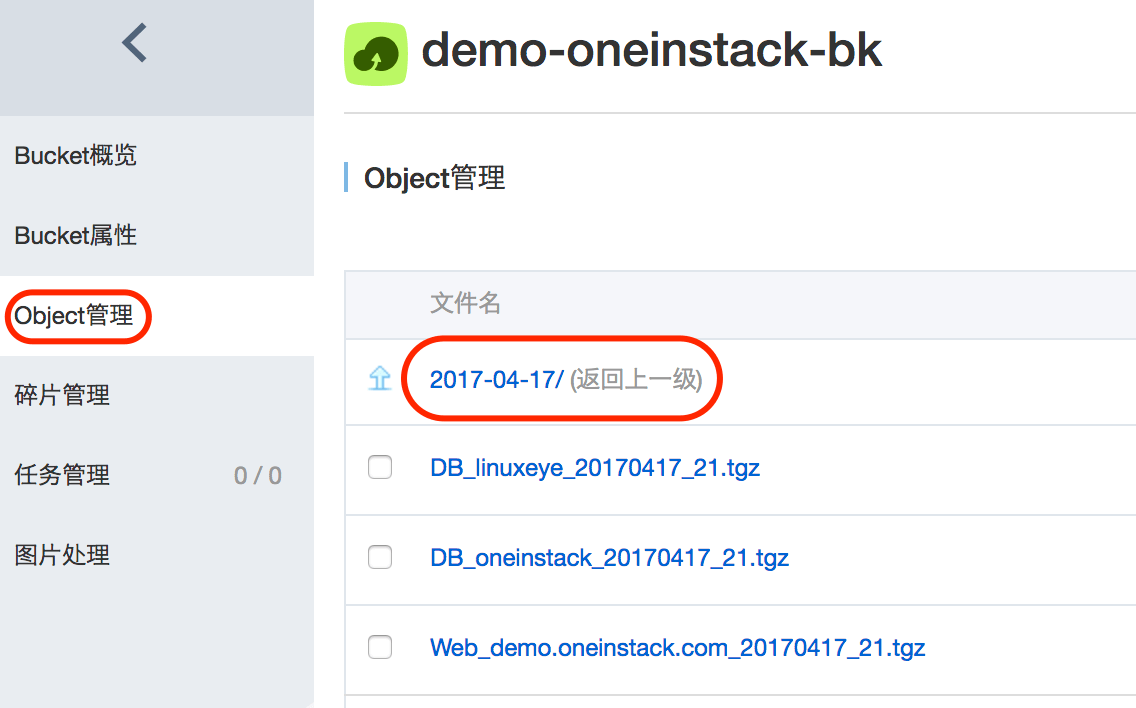
如果设置远程云存储备份,查看某云存储
登陆某云管理控制台
如下图:
如何管理服务
- Systemd
- Service
systemctl {start|stop|status|restart|reload} nginx
更改Nginx配置文件,强烈建议reload,即 systemctl reload nginx
systemctl {start|stop|restart|reload|status} php-fpm
systemctl {start|stop|restart|status} mysqld
systemctl {start|stop|restart|status} pureftpd
systemctl {start|stop|status|restart|reload} redis-server
systemctl {start|stop|status|restart|reload} memcached
service nginx {start|stop|status|restart|reload}
更改Nginx配置文件,强烈建议reload,即 service nginx reload
service php-fpm {start|stop|restart|reload|status}
service mysqld {start|stop|restart|status}
service pureftpd {start|stop|restart|status}
service redis-server {start|stop|status|restart|reload}
service memcached {start|stop|status|restart|reload}
如何升级版本
sudo /root/oneinstack/upgrade.sh
[root@OneinStack ~]# sudo /root/oneinstack/upgrade.sh -h  #注解: 查看升级命令帮助信息
#######################################################################
#       OneinStack for CentOS/RedHat 7+ Debian 9+ and Ubuntu 16+      #
#              Upgrade Software versions for OneinStack               #
#       For more information please visit https://oneinstack.com      #
#######################################################################

Usage: /root/oneinstack/upgrade.sh  command ...[version]....
  --help, -h                  Show this help message
  --nginx        [version]    Upgrade Nginx
  --tengine      [version]    Upgrade Tengine
  --openresty    [version]    Upgrade OpenResty
  --apache       [version]    Upgrade Apache
  --tomcat       [version]    Upgrade Tomcat
  --db           [version]    Upgrade MySQL/MariaDB/Percona
  --php          [version]    Upgrade PHP
  --redis        [version]    Upgrade Redis
  --memcached    [version]    Upgrade Memcached
  --phpmyadmin   [version]    Upgrade phpMyAdmin
  --oneinstack                Upgrade OneinStack latest
  --acme.sh                   Upgrade acme.sh latest

[root@OneinStack ~]# sudo /root/oneinstack/upgrade.sh

#######################################################################
#       OneinStack for CentOS/RedHat 7+ Debian 9+ and Ubuntu 16+      #
#              Upgrade Software versions for OneinStack               #
#       For more information please visit https://oneinstack.com      #
#######################################################################

What Are You Doing?
         1. Upgrade Nginx/Tengine/OpenResty
         2. Upgrade Apache
         3. Upgrade Tomcat
         4. Upgrade MySQL/MariaDB/Percona
         5. Upgrade PHP
         6. Upgrade Redis
         7. Upgrade Memcached
         8. Upgrade phpMyAdmin
         9. Upgrade OneinStack latest
        10. Upgrade acme.sh latest
         q. Exit

Please input the correct option: q
如何添加扩展组件
添加php扩展
如新增swoole扩展,如下命令:
sudo /root/oneinstack/install.sh --php_extensions swoole
可执行 sudo /root/oneinstack/install.sh --help 查看支持哪些扩展
添加附件组件
sudo /root/oneinstack/addons.sh
可执行 sudo /root/oneinstack/addons.sh --help 查看支持参数
[root@OneinStack ~]# sudo /root/oneinstack/addons.sh -h  #注解: 添加附件组件命令帮助

#######################################################################
#       OneinStack for CentOS/RedHat 7+ Debian 9+ and Ubuntu 16+      #
#                    Install/Uninstall Extensions                     #
#       For more information please visit https://oneinstack.com      #
#######################################################################

Usage: /root/oneinstack/addons.sh  command ...
  --help, -h                  Show this help message
  --install, -i               Install
  --uninstall, -u             Uninstall
  --composer                  Composer
  --fail2ban                  Fail2ban
  --ngx_lua_waf               Ngx_lua_waf
  --python                    Python (PATH: /usr/local/python)

[root@OneinStack ~]# sudo /root/oneinstack/addons.sh

#######################################################################
#       OneinStack for CentOS/RedHat 7+ Debian 9+ and Ubuntu 16+      #
#                    Install/Uninstall Extensions                     #
#       For more information please visit https://oneinstack.com      #
#######################################################################

What Are You Doing?
        1. Install/Uninstall PHP Composer
        2. Install/Uninstall fail2ban
        3. Install/Uninstall ngx_lua_waf
        4. Install/Uninstall Python3.6
        q. Exit
Please input the correct option: 3

Please select an action:
        1. install
        2. uninstall
Please input a number:(Default 1 press Enter) 1
如何卸载
sudo /root/oneinstack/uninstall.sh
可单独卸载某些项,如数据库用某云厂商RDS,可单独卸载数据库,注意备份数据
[root@OneinStack ~]# sudo /root/oneinstack/uninstall.sh -h
#######################################################################
#       OneinStack for CentOS/RedHat 7+ Debian 9+ and Ubuntu 16+      #
#                         Uninstall OneinStack                        #
#       For more information please visit https://oneinstack.com      #
#######################################################################

Usage: /root/oneinstack/uninstall.sh  command ...[parameters]....
  --help, -h                    Show this help message, More: https://oneinstack.com
  --quiet, -q                   quiet operation  #注解: 静默执行卸载,不询问是否卸载
  --all                         Uninstall All
  --web                         Uninstall Nginx/Tengine/OpenResty/Apache/Tomcat
  --mysql                       Uninstall MySQL/MariaDB/Percona
  --postgresql                  Uninstall PostgreSQL
  --mongodb                     Uninstall MongoDB
  --php                         Uninstall PHP (PATH: /usr/local/php80)
  --mphp_ver [53~81]            Uninstall another PHP version (PATH: /usr/local/php80${mphp_ver})
  --allphp                      Uninstall all PHP
  --phpcache                    Uninstall PHP opcode cache
  --php_extensions [ext name]   Uninstall PHP extensions, include zendguardloader,ioncube,
                                sourceguardian,imagick,gmagick,fileinfo,imap,ldap,calendar,phalcon,
                                yaf,yar,redis,memcached,memcache,mongodb,swoole,xdebug
  --pureftpd                    Uninstall PureFtpd
  --redis                       Uninstall Redis-server
  --memcached                   Uninstall Memcached-server
  --phpmyadmin                  Uninstall phpMyAdmin
  --python                      Uninstall Python (PATH: /usr/local/python)
  --node                        Uninstall Nodejs (PATH: /usr/local/node)

[root@OneinStack ~]# sudo /root/oneinstack/uninstall.sh

#######################################################################
#       OneinStack for CentOS/RedHat 7+ Debian 9+ and Ubuntu 16+      #
#                         Uninstall OneinStack                        #
#       For more information please visit https://oneinstack.com      #
#######################################################################

What Are You Doing?
         0. Uninstall All
         1. Uninstall Nginx/Tengine/OpenResty/Apache/Tomcat
         2. Uninstall MySQL/MariaDB/Percona
         3. Uninstall PostgreSQL
         4. Uninstall MongoDB
         5. Uninstall all PHP
         6. Uninstall PHP opcode cache
         7. Uninstall PHP extensions
         8. Uninstall PureFtpd
         9. Uninstall Redis
        10. Uninstall Memcached
        11. Uninstall phpMyAdmin
        12. Uninstall Python (PATH: /usr/local/python)
        13. Uninstall Nodejs (PATH: /usr/local/node)
         q. Exit

Please input the correct option: q
更多
如何部署一个php网站
通过Ftp上传代码不需要修改权限,默认已经是 www;在服务器里面下载代码必须修改网站根目录及子、目录文件权限都为 www;如网站权限出现问题,请参考《关于网站根目录权限》
[root@OneinStack ~]# cd /root/oneinstack/src/
[root@OneinStack src]# wget https://cn.wordpress.org/latest-zh_CN.tar.gz    #解析: wget下载wordpress最新稳定代码
[root@OneinStack src]# tar xzf latest-zh_CN.tar.gz                          #解析: 解压wordpress最新稳定代码
[root@OneinStack src]# mv wordpress/* /data/wwwroot/demo.oneinstack.com/    #解析: 移动代码至网站根目录
[root@OneinStack src]# chown -R www.www /data/wwwroot/demo.oneinstack.com/  #解析: 设置网站根目录权限为 www
[root@OneinStack src]# ls -al /data/wwwroot/demo.oneinstack.com/            #解析: 查看网站根目录权限是否正确,正常权限为 www
total 220
drwxr-xr-x  5 www www  4096 Oct 30 19:17 .
drwxr-xr-x  5 www www  4096 Oct 30 16:54 ..
-rw-r--r--  1 www www   405 Feb  6  2020 index.php
-rw-r--r--  1 www www 19915 Oct 18 07:08 license.txt
-rw-r--r--  1 www www  7401 Oct 18 07:08 readme.html
-rw-r--r--  1 www www  7165 Jan 21  2021 wp-activate.php
drwxr-xr-x  9 www www  4096 Oct 18 07:00 wp-admin
-rw-r--r--  1 www www   351 Feb  6  2020 wp-blog-header.php
-rw-r--r--  1 www www  2338 Nov 10  2021 wp-comments-post.php
-rw-r--r--  1 www www  3001 Oct 18 07:08 wp-config-sample.php
drwxr-xr-x  5 www www  4096 Oct 18 07:09 wp-content
-rw-r--r--  1 www www  3943 Apr 28  2022 wp-cron.php
drwxr-xr-x 26 www www 12288 Oct 18 07:09 wp-includes
-rw-r--r--  1 www www  2494 Mar 20  2022 wp-links-opml.php
-rw-r--r--  1 www www  3973 Apr 12  2022 wp-load.php
-rw-r--r--  1 www www 48498 Apr 29  2022 wp-login.php
-rw-r--r--  1 www www  8522 Oct 17 20:20 wp-mail.php
-rw-r--r--  1 www www 23706 Apr 12  2022 wp-settings.php
-rw-r--r--  1 www www 32051 Apr 11  2022 wp-signup.php
-rw-r--r--  1 www www  4817 Oct 17 20:29 wp-trackback.php
-rw-r--r--  1 www www  3236 Jun  9  2020 xmlrpc.php
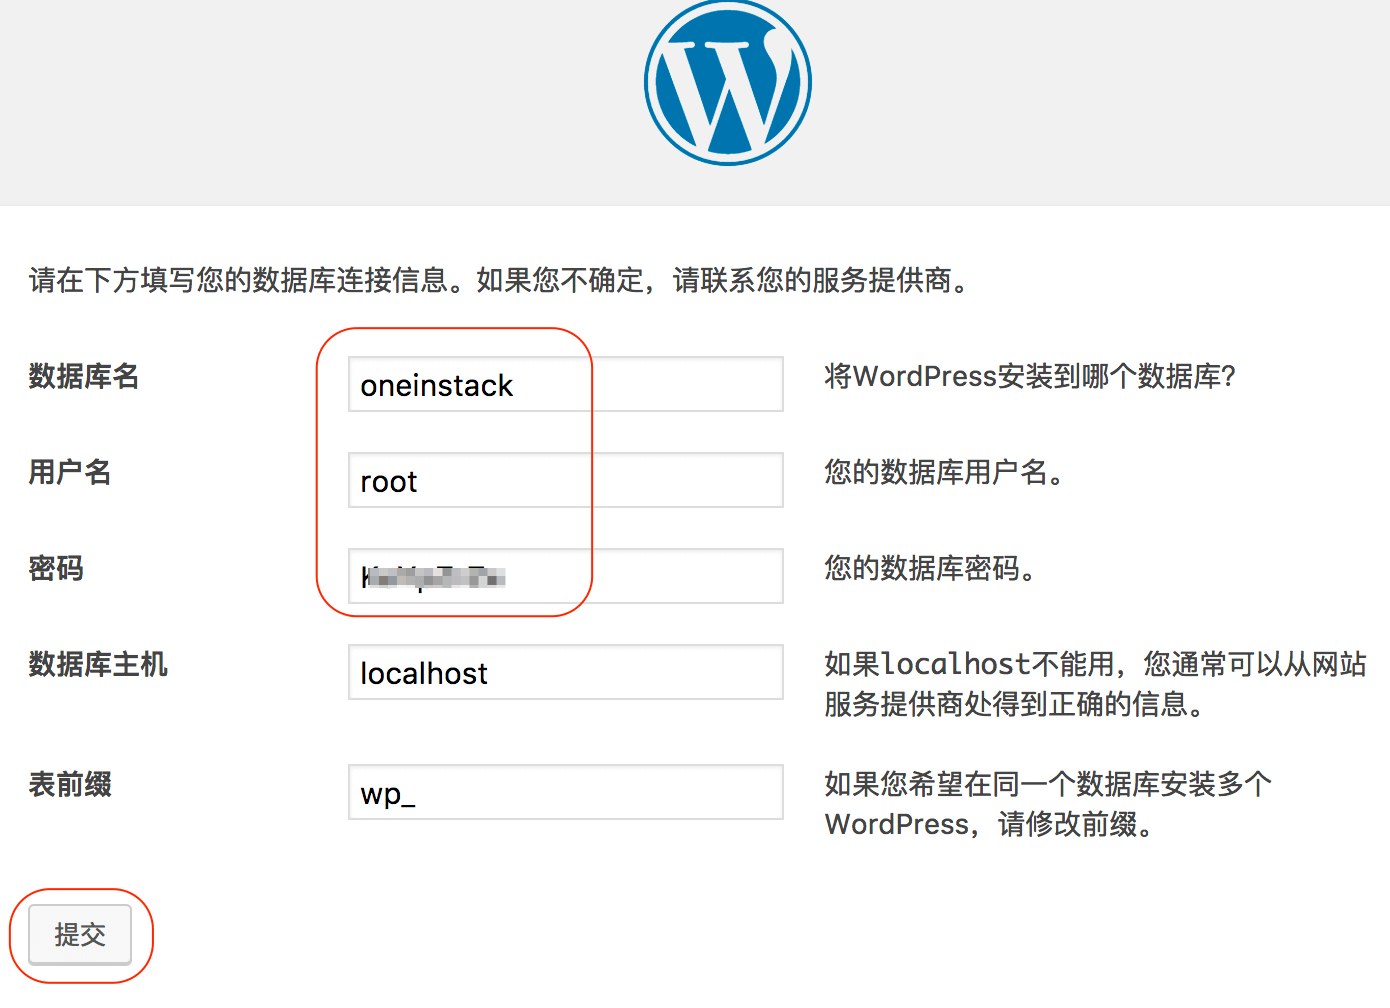
访问 http://demo.oneinstack.com,输入数据库地址(localhost), 用户名(root),密码(数据库root密码),完成。
如下图:
关于php缓存opcache
默认情况下,为了减少PHP编译时间,提高性能(生产环境强烈开启Opcache),默认提供的PHP环境加载了Opcache模块(PHP5.5及以上版本),关于原理请参考:《深入理解PHP Opcode缓存原理》
但是这样会出现PHP代码更新后,需要2~3分钟才能生效,这样影响工作效率,在网站调试阶段建议您关闭或者每次有代码更新刷新缓存,推荐方法二
方法一:卸载Opcache
sudo /root/oneinstack/uninstall.sh --phpcache
[root@OneinStack ~]# sudo /root/oneinstack/uninstall.sh --phpcache

#######################################################################
#       OneinStack for CentOS/RedHat 7+ Debian 9+ and Ubuntu 16+      #
#                         Uninstall OneinStack                        #
#       For more information please visit https://oneinstack.com      #
#######################################################################

Do you want to uninstall? [y/n]: y  #注解: 确认是否卸载phpcache

PHP opcache module uninstall completed  #注解: 卸载成功标识

PHP xcache module does not exist!

PHP apcu module does not exist!

PHP eaccelerator module does not exist!
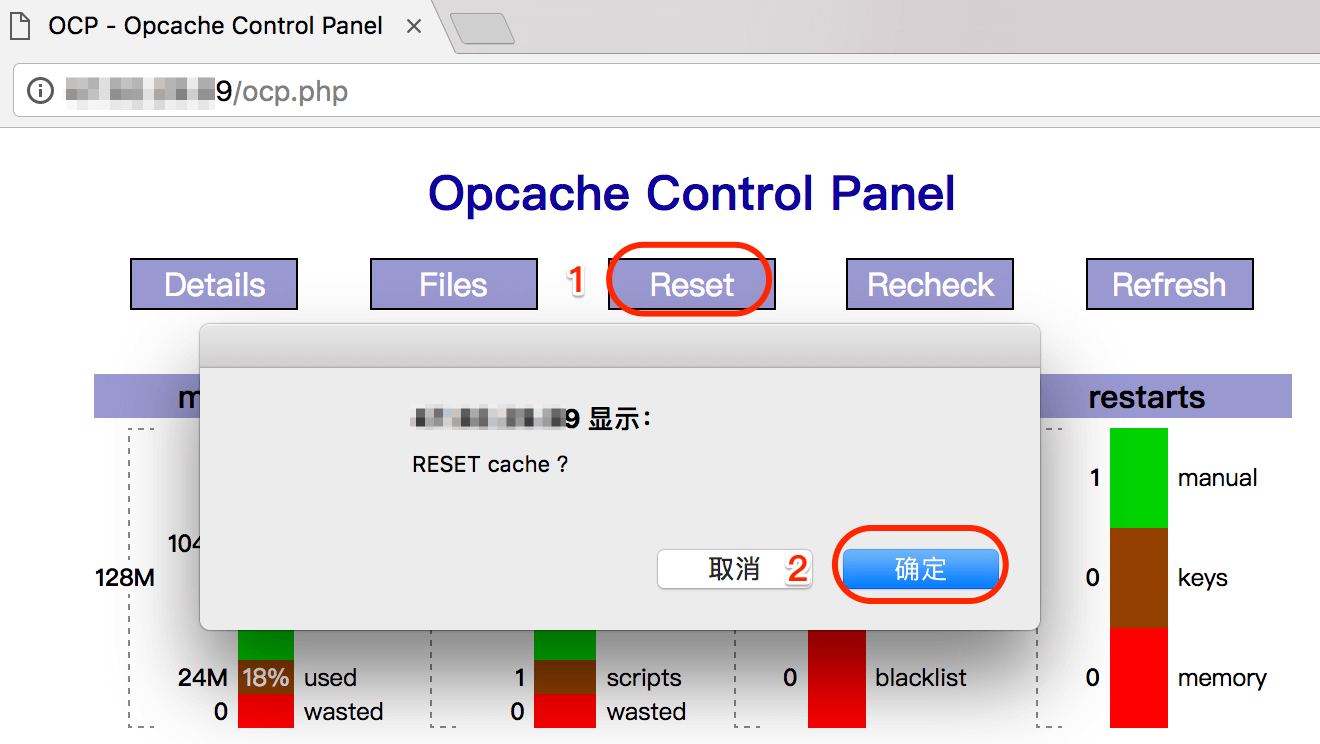
方法二:刷新php缓存
访问 http://公网IP/ocp.php,或者直接访问 http://公网IP/ocp.php?RESET=1
如下图:
关于网站根目录权限
网站根目录权限遵循:
文件 644, 文件夹 755 ,权限用户和用户组 www
如出现文件权限问题时,请执行下面3条命令:
chown -R www.www /data/wwwroot/
find /data/wwwroot/ -type d -exec chmod 755 {} \;
find /data/wwwroot/ -type f -exec chmod 644 {} \;
关于redis、memcached
- Redis默认端口:6379
- Memcached默认端口:11211
- 默认监听地址:127.0.0.1
如何增加Redis最大内存大小?
vi /usr/local/redis/etc/redis.conf
maxmemory 1024000000 #单位字节,默认1G,可调整
systemctl restart redis-server
如何增加Memcached最大内存大小?
vi /lib/systemd/system/memcached.service
Environment=CACHESIZE=256 #单位M,默认256M,可调整
systemctl daemon-reload
systemctl restart memcached
更改Redis监听端口
vi /usr/local/redis/etc/redis.conf
bind 127.0.0.1 #改成bind 0.0.0.0,保存
- Systemd
- Service
systemd是Linux系统最新的初始化系统(init), 作用是提高系统的启动速度,尽可能启动较少的进程,尽可能更多进程并发启动。对应的进程管理命令是systemctl,CentOS7即以上版本和Ubuntu/Debian支持,推荐使用sytemd管理服务。
systemctl restart redis-server
service 老系统使用的服务管理方式,如CentOS5、6。
service redis-server restart
更改Memcached监听端口
- Systemd
- Service
vi /lib/systemd/system/memcached.service
OPTIONS="-l 127.0.0.1" 改成OPTIONS="",保存
systemctl daemon-reload
systemctl restart memcached
vi /etc/init.d/memcached
OPTIONS="-l 127.0.0.1" 改成OPTIONS="",保存
chkconfig memcached on
service memcached restart
关于iptables防火墙
默认情况下开通22(SSH)80、443(Nginx) 21、20000~30000(FTP)
镜像V2.0以上版本,未开启iptables
其它端口都拒绝,如下需要允许其它端口,如开启8080端口,请如下操作
- RHEL,如CentOS
- Ubuntu/Debian
iptables -I INPUT 4 -p tcp -m state --state NEW -m tcp --dport 8080 -j ACCEPT
service iptables save #保存iptables规则
[root@OneinStack ~]# iptables -I INPUT 4 -p tcp -m state --state NEW -m tcp --dport 8080 -j ACCEPT
[root@OneinStack ~]# service iptables save
iptables: Saving firewall rules to /etc/sysconfig/iptables:[  OK  ]
[root@OneinStack ~]# iptables -nvL  #注解: 查看添加的iptables规则,在第4行
Chain INPUT (policy DROP 14 packets, 586 bytes)
 pkts bytes target     prot opt in     out     source               destination
    0     0 ACCEPT     all  --  lo     *       0.0.0.0/0            0.0.0.0/0
  206 15880 ACCEPT     all  --  *      *       0.0.0.0/0            0.0.0.0/0            state RELATED,ESTABLISHED
    0     0 ACCEPT     tcp  --  *      *       0.0.0.0/0            0.0.0.0/0            state NEW tcp dpt:22
    0     0 ACCEPT     tcp  --  *      *       0.0.0.0/0            0.0.0.0/0            state NEW tcp dpt:8080
    0     0 ACCEPT     tcp  --  *      *       0.0.0.0/0            0.0.0.0/0            state NEW tcp dpt:80
    0     0 ACCEPT     tcp  --  *      *       0.0.0.0/0            0.0.0.0/0            state NEW tcp dpt:443
    0     0 ACCEPT     tcp  --  *      *       0.0.0.0/0            0.0.0.0/0            state NEW tcp dpt:21
    0     0 ACCEPT     tcp  --  *      *       0.0.0.0/0            0.0.0.0/0            state NEW tcp dpts:20000:30000
   29   812 ACCEPT     icmp --  *      *       0.0.0.0/0            0.0.0.0/0            icmptype 8

Chain FORWARD (policy ACCEPT 0 packets, 0 bytes)
 pkts bytes target     prot opt in     out     source               destination

Chain OUTPUT (policy ACCEPT 219 packets, 38990 bytes)
 pkts bytes target     prot opt in     out     source               destination

Chain syn-flood (0 references)
 pkts bytes target     prot opt in     out     source               destination
iptables -I INPUT 4 -p tcp -m state --state NEW -m tcp --dport 8080 -j ACCEPT
iptables-save > /etc/iptables.up.rules  #保存iptables规则
[root@OneinStack ~]# iptables -I INPUT 4 -p tcp -m state --state NEW -m tcp --dport 8080 -j ACCEPT
[root@OneinStack ~]# iptables-save > /etc/iptables.up.rules
[root@OneinStack ~]# iptables -nvL  #注解: 查看添加的iptables规则,在第4行
Chain INPUT (policy DROP 20 packets, 1186 bytes)
 pkts bytes target     prot opt in     out     source               destination
    0     0 ACCEPT     all  --  lo     *       0.0.0.0/0            0.0.0.0/0
  206 15880 ACCEPT     all  --  *      *       0.0.0.0/0            0.0.0.0/0            state RELATED,ESTABLISHED
    0     0 ACCEPT     tcp  --  *      *       0.0.0.0/0            0.0.0.0/0            state NEW tcp dpt:22
    0     0 ACCEPT     tcp  --  *      *       0.0.0.0/0            0.0.0.0/0            state NEW tcp dpt:8080
    0     0 ACCEPT     tcp  --  *      *       0.0.0.0/0            0.0.0.0/0            state NEW tcp dpt:80
    0     0 ACCEPT     tcp  --  *      *       0.0.0.0/0            0.0.0.0/0            state NEW tcp dpt:443
    0     0 ACCEPT     tcp  --  *      *       0.0.0.0/0            0.0.0.0/0            state NEW tcp dpt:21
    0     0 ACCEPT     tcp  --  *      *       0.0.0.0/0            0.0.0.0/0            state NEW tcp dpts:20000:30000
   29   812 ACCEPT     icmp --  *      *       0.0.0.0/0            0.0.0.0/0            icmptype 8

Chain FORWARD (policy ACCEPT 0 packets, 0 bytes)
 pkts bytes target     prot opt in     out     source               destination

Chain OUTPUT (policy ACCEPT 219 packets, 38990 bytes)
 pkts bytes target     prot opt in     out     source               destination

Chain syn-flood (0 references)
 pkts bytes target     prot opt in     out     source               destination